
Mastering Wide Legged Forward Bend: A Guide for Yoga Teachers
Becca is the author of Teaching Yoga: Creative Cueing for Safer Mixed Level Classes. A long-time studio owner and teacher trainer, she now teaches in OKC and creates resources for other yoga teachers.
Alignment, Cueing, Modifications, Benefits, Variations
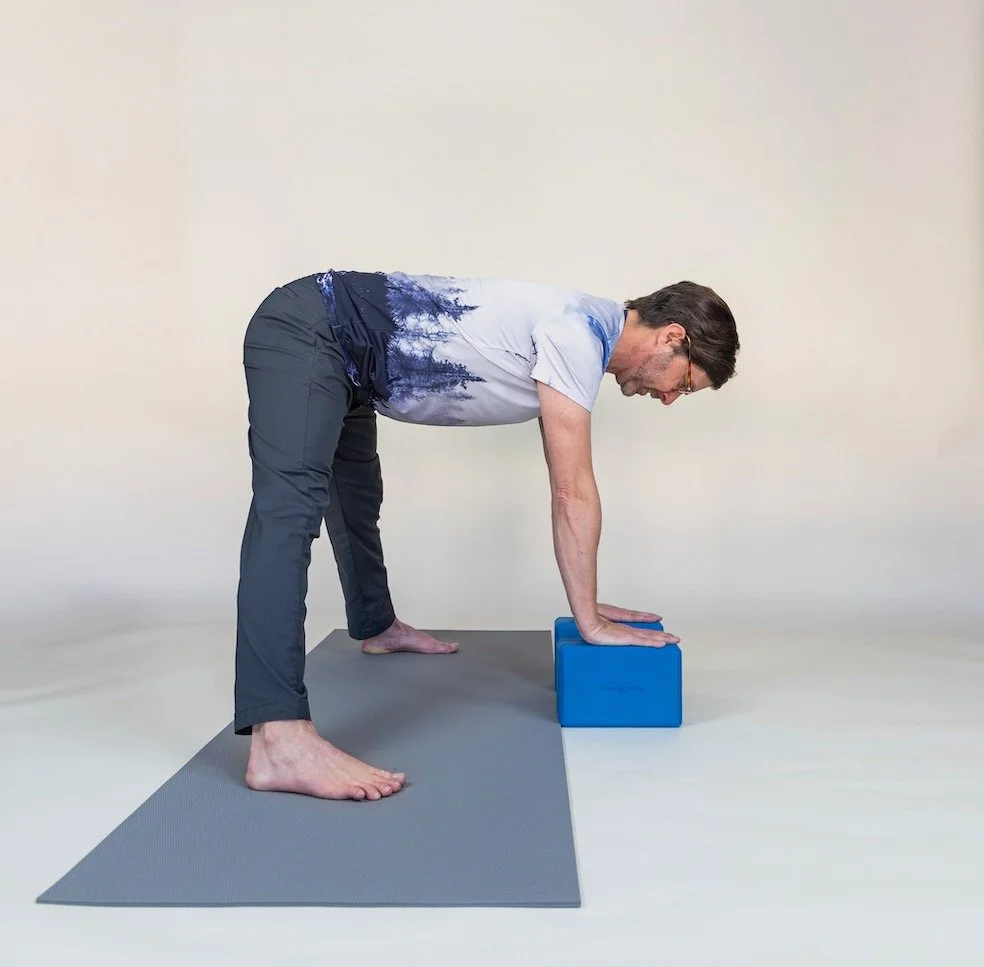
My friend Tim Bodenstein showing a modified Prasarita Padottanasana
Sanskrit:
Prasarita Padottanasana
(pra-sa-REE-tah pah-doh-tahn-AHS-anna)
Prasarita = spread
pada = foot
uttana = intense stretch
Other commonly used names and abbreviated names yoga teachers use when referring to prasarita padottanasana and its variations:
Standing Wide Legged Forward Fold
Wide Legged Forward Fold
Prasarita Padottanasana a (also b, c, and d)
Padottanasana
Wide Angle (although it really refers to the seated version)
Wide Legged Forward Bend is a staple pose I frequently include in my classes. I always offer modifications because my classes tend to have students of all levels, including those over 50. As teachers, we have to quickly evaluate students attending class and decide what variations of the pose to offer and who might need options. In today’s post, I’m first covering often-asked cueing questions from newer teachers, and then I’ll return to basics and review modifications, benefits, sequencing, and variations.
What is the best alignment for the feet in Wide Legged Forward Bend?
This question pops up in yoga groups on social media frequently. Young teachers hear various instructions, so what is the “right” way? If you were taught to turn your toes in slightly pigeon-toed when practicing Wide-Legged Forward Bend, then you are not alone, as it is a very common instruction.
When I first started yoga, I practiced and taught the pose this way, but as I gained experience, I realized it wasn’t working for all my students. The takeaway here is that we are all built a little differently, and so there is no one right way to do a pose. The right way is to have an alignment that works for you or your students and doesn’t cause discomfort in the knees and hips.

Why isn’t the cue “turn the feet slightly pigeon-toed” not always the best?
This instruction goes way back in yoga and is based on the idea that turning our feet inward helps take the inner thighs back (slight internal rotation of the hips). This, in turn, helps us lift and separate the sitz bones, thus deepening the stretch on the pelvic floor, hips, and hamstrings.
A few issues come up when we give this cue to a mixed-level group. Some students have much less flexible hips and can’t really internally rotate their hips much. When they are told to turn their feet inward, their hips can’t follow that movement, and the torque goes into their knees.
On the other end of the spectrum, we have super flexible students who do not need to move deeper into the pose. These students risk creating hamstring attachment tears when they focus too much on taking the sitz bones “up and away.” It is better for these students to focus on engaging the glutes and stabilizing the pelvis.
➪ Join my FREE Teaching Yoga Course for more great tips and discussions.
➪ Check out my video library! Over 400 videos with accessible classes, including modifications.
Cueing options for Wide Legged Forward Bend
The best way to keep students safe is to teach from the hips first. Instead of focusing on the angle of the feet in the poses, cue the hips first and then let the knees and toes follow. When we cue the feet at specific angles first and try to force all students into the same position, students’ hips may be unable to accommodate that position. When the feet and the hips are not moving naturally together, the torque goes to the knees.
Much less flexible students may need to turn their hips outward slightly and let the knees and toes follow. Although this is not a traditional alignment for this pose, it is safer and feels better to these students. If they also bend their knees and use blocks under their hands, then they are more likely to stretch the body of the hamstrings rather than hurt their knees or hamstring attachments.
One way to start cueing this pose is to say something like, “Take a comfortable wide stance, bend your knees a little, and then fold forward, keeping your spine long. Place your hands on the blocks and lengthen your spine.” From there, evaluate how the students are doing in the pose. If there are students who have turned their hips out quite a bit, then bring the students back up to standing and ask them to try and bring their hips into a more neutral position. Some may still be a little turned out and that is just fine. As they move back into the forward bend, watch to see if their knees are tracking with their toes and if they are lengthening their spines.
In this video I review some ot the cueing options discussed in this blog. Enjoying this content? For more like it join my FREE course based on my book Teaching Yoga: Creative Cueing for Safer Mixed Level Classes.
➪ Join my FREE Teaching Yoga Course for more great tips and discussions.
Common Misalignments and Potential Issues

If you like this post, pin it to Pintrest! ⇧
Rounding the back: Without support, a rounded back in a forward bend puts a lot of pressure on the discs, especially those of the lower back. Hanging over with a rounded spine may lead to disc issues or aggravate issues already present.
Unengaged muscles: It's common for students not to engage the thighs and glutes in standing forward bends. Engaging these muscles (firming, squeezing, hugging the bones) keeps the stretch more in the body of the muscles and protects the joints, most especially in very flexible individuals.
Neck not in line with the spine: Some students let their necks go soft and flop their heads over, while others extend their necks and look forward. Both actions can strain the cervical spine, especially if repeated frequently. Use the muscles of the neck, including those on the throat, to stabilize the neck, holding it in line with the spine. This will also help with posture issues.
Shifting the hips too far forward or too far back: Although neither of these actions is necessarily wrong, they target different areas of the legs. When students shift their hips forward of the feet, the stretch moves down towards the calves and the heels; this may be too much pressure on the Achilles tendon attachments, depending on the student. They may be doing this to get their hands to the floor, but their pose starts to look more like a Downward Dog. Shifting the hips behind the feet is an action that feels good to some flexible students, but this takes the stretch more into the upper hamstrings and may put too much pressure on the attachments at the sitz bones.
Common Modifications for Wide Legged Forward Bend
Bend the knees: For those who are a little less flexible to extremely tight, it is important to bend the knees to avoid injuries of the low back and the hamstring attachments. Even flexible people can benefit from bending the knees at times to change the experience of the pose.
Hands on blocks: For less flexible students, this modification is important to avoid low back issues and injuries.
Hands on chair seat: For much less flexible students or those with prior hip or back injuries, use a chair to avoid further issues and injuries.
Hands on Wall: For extremely tight and less mobile students with prior hip and or back injuries, use the wall to avoid further issues and injuries.
Wide Legged Forward Bend Benefits
Stretches the hamstrings, the calves, inner thighs, and the pelvic floor
Warms up and stretches the muscles around the hip joints
Calms the body and mind (forward bends are calming)
Grounding feeling with both feet and hands on the floor
For those who can fold over deeply, it creates a release and lengthening of the spine
Forward bends may aid in digestion issues such as constipation
Sequencing Wide-Legged Forward Bend in Class
The effective placement of this pose in a standing sequence depends on how much warm-up the class participants require. I love doing a few forward bends when I get up in the morning, but this is inappropriate for many students.
Those with less flexible hips need to work through a few standing sequences, including poses like Warrior 1 and 2, Triangle, Tree, Goddess, and Side Angle, in order to warm up the hips. If their hips are not warmed up enough, they are more likely to round over, putting their low backs at risk. Once students are warmed up, I often practice this pose after doing poses like Warrior 2 and Triangle, which face the long side of the mat. The transition from these poses, by pivoting on the heels, is simple.
For more active and athletic students who are working towards arm balances and other poses requiring deep hip rotations, a wide-legged forward bend is an important warm-up. Place the pose throughout preparatory standing sequences.
Variations of Wide Legged Forward Bend (Prasarita Padottanasana)
I am including Sanskrit here as it is often used when referring to these basic variations with the letters a, b, c, or d used after the name. This nomenclature is common in some traditional yoga circles. Please note that yoga teachers have different ideas about which letter refers to which variation. I’ll start with the most common uses first and then the old-school sequenced version that I learned back in 2002.
The first set of photos below shows how the most popular sites on the internet currently refer to the variations of Wide Legged Forward Bend. Please note that just because it is all over the internet doesn’t mean that it is the only “right” way. A few people uploaded the names in this manner, and then others followed.


Prasarita Padottanasana a: This photo shows the basic pose with fingers in line with the toes. Most students need to modify this pose, as listed in the blog post above.
Prasarita Padotanasana b: In this version, the hands are on the hips, and the yogi lengthens out the back. For my students, I bring hands on the hips to transition from standing into forward bends, but I do not have them hold the pose in this position. I have them quickly bring their hands to blocks or the floor to support the back.
Prasarita Padotanasana c: This more challenging variation involves clasping hands behind the back. This can be modified by placing the hands palms up on the back of the pelvis. Again, this version is usually not a good choice for many of my students, but I love the variation personally.
Prasarita Padotanasana d: In this common variation, the yogi holds the big toes with the fingers or holds onto the outside of the feet.
The Old School Version
The original sequence that I learned works more like a warm-up. The simplest Variation that is easiest on the hips and hamstrings is first. Then, each time that we revisit the pose, the variations are more challenging. For my own practice, I like to work through these variations one after the other with a little flow. For my students, I offer the first and second versions with blocks under their hands. You can find a detailed description of this older version in Dona Holleman’s book from the late 90s titled Dancing the Body of Light (it’s affordable if you go for a used paperback).


More Variations of Wide Legged Forward Bend
If you are still reading this long post, then you are most likely a yoga nerd like me, OR you just like to learn. I am so glad you are here! So, I have one last thing I want to add about all these variations. If you are teaching younger people who wish to practice arm balances, then infuse all of these variations into your standing flows as a preparation. Why? If the hips are not warmed and ready, then they cannot rotate enough to safely practice some of the arm balances. In some cases, when the hips do not move, then the knees become torqued. If the arm balances do not come easily for you, then move on and work on something else. Your hips will thank you in 20 years.
I enjoyed putting this post together! If you enjoyed reading it, let me know, and I’ll break down more poses soon. ♢


Liked this post? Check out my links below!

Pin Me!
➪ For more teaching yoga tips, check out my book on Amazon
➪ Get 6-hours of CEUs:
FREE Mixed Level Teaching Essentials Course
➪ Check out my video library! Over 400 videos with accessible classes, including modifications.