
Benefits of Trikonasana: A Complete Guide to Triangle Pose
Becca is the author of Teaching Yoga: Creative Cueing for Safer Mixed Level Classes. A long-time studio owner and teacher trainer, she now teaches in OKC and creates resources for other yoga teachers.
Learn the Key Benefits, Proper Alignment, Modifications, and How to Teach Triangle Effectively

Sanskrit Name: Uttihita Trikonasana
Pronunciation: oo-TEE-tah trik-cone-AHS-anna
Uttihita - stretched, extended
Tri - three
Kona - angle
Asana - posture
If you are looking for a list of all the possible benefits of Trikonasana, you are in the right place! In this post, I will also cover basic alignment, modifications, and teaching tips.
Although some people try to differentiate between the names Triangle and Extended Triangle, I don’t differentiate this way. I use Extended Triangle as the pose name and label the different versions as modifications, options, or variations. Most teachers refer to this pose as Triangle, but all variations traditionally fall under the name Extended Triangle (Uttihita Trikonasana).
Benefits of Trikonasana
I’ve gathered a list of benefits generally accepted in most yoga circles. Some of the benefits listed here are part of practicing yoga in general and can be listed for other poses, too.
Physical Benefits
Strengthens the legs, core, and spine
Stretches the hamstrings, hips, and inner thighs
Opens the chest and shoulders
Improves balance and stability
Massages internal abdominal organs, aiding digestion
Mental & Emotional Benefits
Improves focus and concentration
Reduces stress and anxiety
Extra Benefits
Boosts energy levels
Relieves everyday hip and lower back pain
Want to learn how to practice, teach, and modify Triangle correctly? Let’s break it down step-by-step below!
How to Practice Triangle Pose
For yoga beginners, it's best to start with simple, clear instructions. First, you must learn where to place your feet, legs, and arms. But just like any endeavor, yoga requires layers of understanding and awareness. For this reason, after some simple beginning instructions, I’ve included a few nerdy, in-depth cues.
Step-by-Step Triangle Instructions for Beginners

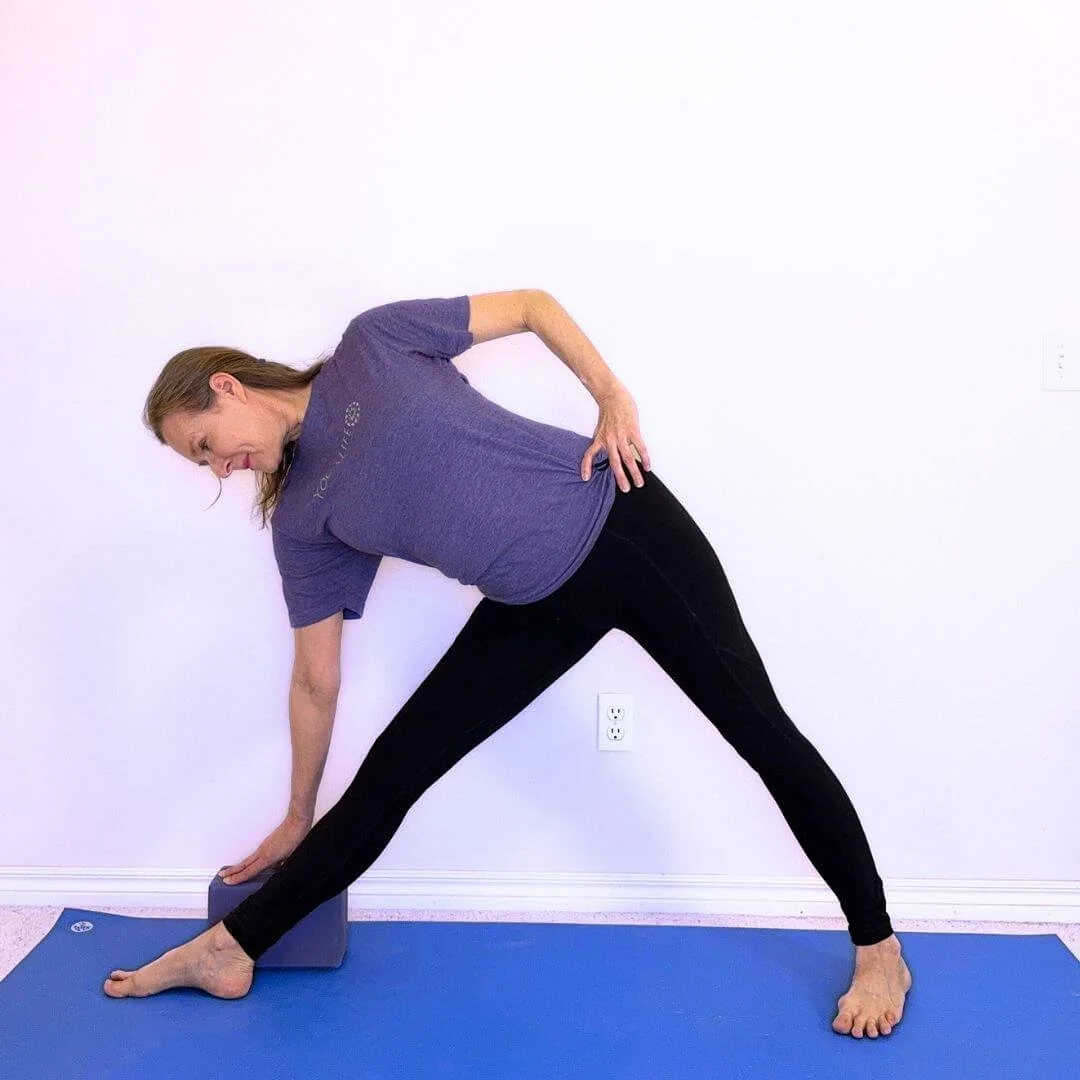
Triangle pose with a block under the bottom hand. This is the most common and most accessible modification/variation.
Start in Moutain pose, facing the long side of your mat. Take a wide stance (that is comfortable for you).
Turn your right hip out and let your knees and toes follow that turn-out. (Your right toe will be pointing more toward the short end of the mat now.)
If you can, turn your left hip inward a little (otherwise, leave it in a neutral position), and again, let your knees and toes follow that turn-in.
Place your heels in a line or slightly wider apart.
Extend your arms parallel to the floor, palms facing down.
Engage your legs and core to maintain balance.
Take an inhale to prepare, and on your exhale, fold over your right leg.
Place your lower hand (your right) on a block behind your shin or ankle.
Reach your left hand up with your palm facing forward. Extend your arm and let your hand float either above your shoulder or slightly in front of your shoulder. If your shoulder doesn’t feel good in this position, then place your left hand on your left hip.
Hold the pose for a few breaths and experience how it feels in your body.
Yoga Teacher Cueing Tip:

For more teaching yoga ideas check out my book on Amazon!
I don’t cue from the feet or use the percentages in my cues to beginners. For instance, I don’t say, “Turn your foot to 90 degrees.”Although this is a very traditional way to cue the standing poses, many new students can’t turn their hips out enough for their toes to point at 90 degrees. So, when they force their feet into this position and their hips move with it, torque occurs in their knees. For this reason, especially with beginners, I cue from the hips. Everyone's feet don’t point in the exact same way in my classes. For a more detailed explanation of this, check out my book.
Additional nerdy cues to try:
Place equal weight on each foot.
Spread your toes out and ground into the big toe mounds and the outer heels.
Work the legs and feet away from each other as if to make your mat longer.
Imagine you are reaching your sit bones towards your heels to activate your glutes.
Engage the core and push the feet away from each other to rise back up.
Engage your core and elongate your spine.
Imagine energy moving into your legs and arms and then outward through your limbs.
What Muscles Does Triangle Pose Work?

Pin Me!
Moving into Triangle, holding it, and then moving out of the pose engages multiple muscle groups:
Legs – Quadriceps, hamstrings, and calves
Glutes - maximus, minimus, and medius
Pelvic - piriformis, obturator externus
Core – Internal and external obliques, along with the entire core unit
Spine – extensors and flexors, latissimus dorsi
Shoulders & Chest – rotator cuff muscles, deltoid, triceps
Feet - all the muscles of the feet
Common Triangle Alignment Issues & How to Fix Them
If our students are not in healthy alignment, they may hurt themselves over time instead of experiencing the benefits of Trikonasana. Below is my list of the most common alignment issues that, if not corrected, may cause our students to have shoulder, back, or neck issues.
Bending the spine sideways and collapsing into the bottom hand. ⇨ Place a block under the hand, cue to engage the core and elongate the spine.
Rotating the torso downward with the top hand floating out in front. ⇨ Place the top hand on the hip, cue to engage the core, and rotate the chest open to the side.
Flopping the top arm backward. ⇨ Cue to move the arm aligned over the shoulder, or slightly in front of the shoulder, visible in peripheral vision.
Shifting hips back and torso forward. ⇨ Bring the student out of the pose and start over. Ask them to engage the core, hold their hips still, and fold over their front leg.
Pinching the neck or sticking out the chin trying to look up. ⇨ Ask the student to just look forward instead of trying to look up, cue to elongate the spine and keep the neck in line with the spine.
➪ Want to study and learn about more yoga cues and modifications? Join my free video course based on my book.
Common Modifications for Triangle Pose
We want everyone who comes to our classes to experience the benefits of Trikonasana. For this reason, it is imperative that we know all of the possible modifications to offer. In the rec center classes I teach, the most common modifications I offer for beginners are:
Place the hand on the hip for those with shoulder issues or pain. Offer looking downward to relieve neck discomfort.
Shorten the stance. ⇨ I offer this to those who are having trouble balancing and those who are less flexible.
Widen the stance. ⇨ The tradition of placing the heels in a line doesn’t work for everyone. I offer this modification to those who are struggling to balance and those who are less flexible.
Place a block under the bottom hand. ⇨ Using a block makes the pose more comfortable for those with less flexible hamstrings and hips.
Place the top hand on the hip instead of extending it upwards. ⇨ The modification works well for those with less flexible shoulders or previous shoulder injuries or issues.
Modifications For Senior Beginners or Those with Injuries:


Place the bottom hand on the thigh instead of a block or the shin. ⇨ Offer these options to people with higher-than-average hamstrings and hips who may also have balance issues.
Place the bottom hand on a chair seat instead of on a block. ⇨ This is a great option for seniors with limited mobility and balance issues.
Place the bottom hand on the wall shoulder-height or above. ⇨ This is another great option for seniors with limited mobility and balance issues.
Practice with the back and pelvis very close to a wall. ⇨ A safer option for those with instability and balance issues.
Gaze forward or downward instead of up. ⇨ Offer this option to those who struggle to turn their neck and gaze upward and who experience neck strain when they try. Although not the traditional gaze, the neck is better designed to support the head's weight when looking down.
Where to Place Triangle Pose in Yoga Sequences
The triangle is a hip-opening pose that warms the entire body. It's great preparation for other more difficult standing poses that require deep hip ROM. Early in our standing sequences, most students at my rec classes, even the older ones, can access a basic modified version with a hand on the shin or a block.
Triangle pose works nicely in a sequence with other poses that face the long side of the mat. Here are some examples of beginning sequences that work for my students and me:
Mountain, Warrior 2, Side Angle, Dancing Warrior, Triangle, Dancing Warrior, Warrior 2
Mountain, Warrior 1, Airplane, Warrior 2, Triangle, Dancing Warrior, Warrior 2
Warrior 2, Triangle, Warrior 2, Side Angle, Dancing Warrior, Humble Warrior
Once you’ve gone through a few of these very basic sequences and the hips are warmed, then more challenging poses may be added to the sequences depending on students' abilities:
Warrior 2, Side Angle, Warrior 2, Triangle, Dancing Warrior, Half Moon
Warrior 2, Side Angle, Triangle, Revolved Triangle, Warrior 2, Dancing Warrior, Half Moon, Warrior 2, Wide-Legged Forward Fold
Warrior 2, Triangle, Side Angle, Dancing Warrior, Half Moon, Revolved Half Moon, Half Moon, Warrior 2 (Challenging)
Triangle Pose Can Help Everyone
Triangle is a foundational pose that offers strength, flexibility, and balance while being adaptable for all levels. Everyone can experience the benefits of Trikonasana if simple, clear cues and the right modifications are offered. I hope this post has helped you learn about this possibilities for this pose. If you liked my pose descriptions and want to explore more, then check out my book, 📖 Teaching Yoga: Creative Cueing for Mixed Level Classes. ♢

➪ For more teaching yoga tips check out my book on Amazon
➪ Get 6-hours of CEUs:
FREE Mixed Level Teaching Essentials Course!
➪ Check out my video library! Over 400 videos with accessible classes, including modifications.